
Introduction
While working with a Ryobi miter saw you may notice that the clamp is not working. The situation is really irritating.
That’s why you’re wondering why the Ryobi miter saw clamp doesn’t work.
Ryobi miter saw clamp doesn’t work due to a damaged clamp, baseplate, or misaligned baseplate. This can be resolved by aligning the baseplate or replacing the clamp, and baseplate. Additionally, if the screws are damaged or decayed, this can also cause the clamp to malfunction, but this can be remedied by simply replacing the screws.
Read the whole article to know the solution in a detailed manner. It’ll help you to solve the issue on your own. Without further ado let’s get started.
Ryobi Miter Saw Clamp Doesn’t Work: Reasons And Solutions
The clamp in Miter Saw helps to ensure that the workpiece stays in place and that cuts are made accurately and safely.
| Reasons | Solutions |
| Damaged clamp | Replace the clamp |
| Misaligned base plate | Tighten the screw of the base plate |
| Damaged base plate | Replace the base plate |
| Damaged or decayed screws | Replace the screw |
Reason 1: Damaged Clamp
 Source: https://www.ebay.co.uk
Solution
A damaged clamp should be replaced with a brand-new one, costing you around $25. It will definitely ensure the proper functioning of the miter saw clamp. You need to unscrew the remaining screws from the current clamp with your hand.
Then settle down the new clamp and re-screw those screws perfectly. Don’t overtighten it, otherwise, it will have difficulty running.
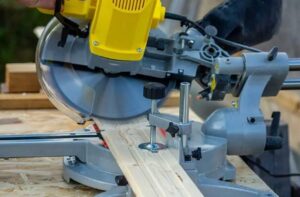
Reason 2: Misaligned Base Plate
So, if the base plate is not properly aligned with the saw blade, the saw may not cut accurately, and the clamp may not hold the workpiece in place as it should. Such misalignment will also result in your miter saw not cutting all the way through.
Solution
You can get over the situation just by tightening the screws of the base plate. Follow the steps below to do that tightening task perfectly.
Required Tools: Wrench
Step 1: Use a wrench or socket set to loosen the bolts that secure the base plate to the tool or machine. Do not remove the bolts completely yet.
Step 2: Once the bolts are loose, gently adjust the base plate to the desired position. Use a level or straight edge to ensure that the plate is aligned properly.
Step 3: Now tighten the base plate in a cross pattern. For tightening the bolts to the recommended torque specification, you need to follow the user manual.
Step 4: After tightening the bolts, check the alignment of the base plate again to ensure that it is still properly aligned.
If tightening is not enough, you have to align the base plate. For that, you can get demo help from the following in-depth video tutorial.
How to: Miter Saw Alignment
Reason 3: Damaged Base Plate
A cracked or broken base plate is not able to grip the workpiece tightly enough to hold it securely in place.
 Source: https://quicktooltips.com
Solution
If the problem is happening with a damaged base plate, you need to replace the base plate. Seek professional help for this replacement as the base plate mechanism can be quite overwhelming.
Reason 4: Damaged or Decayed Screw
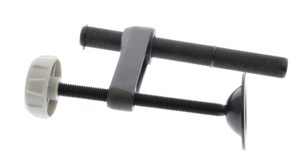
The primary mechanism of the clamp is related to the hand screw that comes with it. This can cause the clamp to become loose, making it difficult to tighten and adjust. An unsecured workplace is one of the reasons your miter saw isn’t cutting straight.
 Solution: https://www.homemadetools.net
Solution
The situation can be resolved just by replacing the screw. Unfortunately, the screw isn’t sold separately. So, if you find it damaged, replacement of the clamp is necessary. Go through the steps below to know the replacement process.
Tools Needed:
- New miter saw clamp
- Wrench
- Safety glasses
- Gloves
Step 1: Turn off the miter saw and unplug it from the power outlet.
Step 2: Use the wrench to loosen the screws that secure the old clamp to the miter saw.
Step 3: Remove the old clamp from the miter saw.
Step 4: Install the new clamp on the miter saw, making sure that the screws are properly tightened.
Step 5: Turn on the miter saw and test the new clamp to make sure that it is working properly.
You can also opt for a DIY homemade clamp by following this tutorial.
Quick & Simple Homemade Miter Saw Clamp | DIY Saw Vertical Clamp | Cutting Very Small Pieces | XDIY
Maintenance Guide of Ryobi Miter Saw Clamp
You can decrease the number of potential clamp issues with some tips given below
- Always make sure to clean the clamp to get rid of extra debris and dust. This will ensure reciprocating saw blade wobble won’t happen.
- Inspect the clamp regularly. If you find out any tear or wear, replace it immediately.
- Also, properly align the clamp.
- Proper lubrication is important to operate the clamp smoothly. You can use a light machine oil or silicon spray to lubricate the pivot and moving parts.
FAQs
When Should I Replace My Miter Saw?
If your miter saw is no longer making accurate cuts, even after adjusting the settings, it may be time to replace it. If your miter saw has been heavily used and is showing signs of wear and tear, such as a worn blade, cracked or broken parts, or excessive rust or corrosion, it may be time to consider replacing it.
How Do You Fix The Laser On A Ryobi Miter Saw?
First, check the batteries to know if it is fully charged. Then align the laser. You need to loosen the screws that hold it in place which adjusts its position and then tightens the screws again. Then, make sure all the connections are properly secured. You need to clean the lens of the laser module to avoid the dim and blurry laser.
How Do You Unlock A Miter Saw Handle?
You can unlock a miter saw handle involves pushing a release button or the lever while simultaneously pulling the handle outward. Also, you can unlock the handle just by griping the handle firmly and twisting it counterclockwise while pulling it outward.
Conclusion
Hopefully, you’ve to go to know why the Ryobi miter saw doesn’t work by going through the article.
You’ll be able to find out the exact issue with your clamp and its solution of it. It is important to prioritize safety when working with a saw and to ensure that it is unplugged from the electric source before use. This is the final tip to keep in mind while operating a saw.
Wish you all the best in your venture!

